Technical equipment of the studio
The studio consists of two equally important parts: the hardware equipment and the software. Depending on the configuration of the studio, the specific characteristics of the studio equipment may vary slightly.
The main components of the studio are:
1. Sensor glass board
2. Studio server
3. Studio monitor
4. Projector
5. Right speaker screen
6. Two left speaker screens
7. Camera with teleprompter
8. Studio light
9. Stand with black and white backdrops
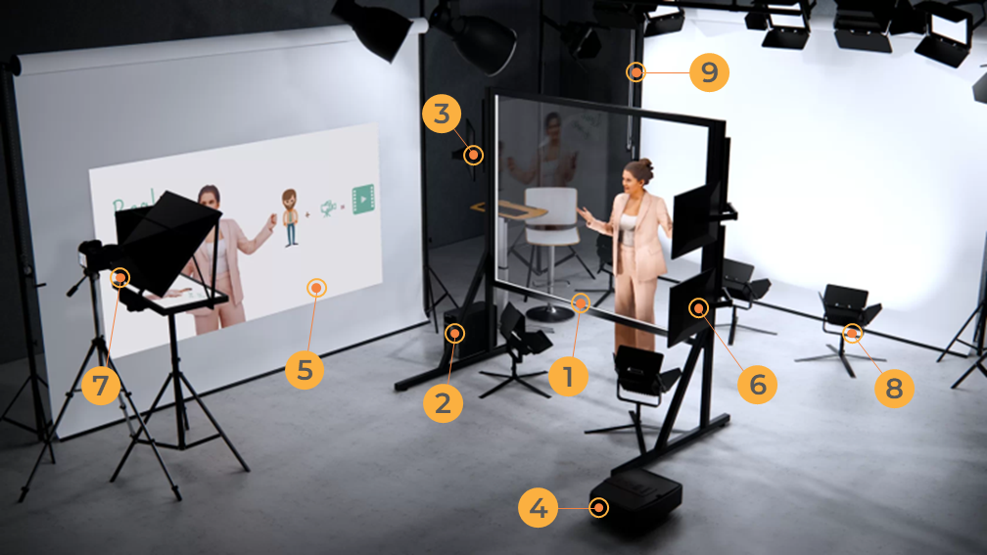
1. The sensor glass board is one of the key elements of the studio. Using the board, we can interact with objects in the presentation and also write and draw on it with a special marker. Everything you write and draw is digital so it can be erased in one click or you can use a digital eraser. If you prefer using physical tools, you can choose the special magnetic sponge that comes with the studio package.
Note: please try to make sure the board stays clean, it should be wiped down after each use, do not leave fingerprints or streaks on it, they will affect the video quality
2. The studio server is the “brain of the studio”. The server is a powerful computer that you can use like any other ordinary PC — use the internet, office programs and much more. The server’s main feature is the pre-installed Jalinga Studio licensed software, which combines recording and presentation editor functions.
3. The studio touch monitor performs the same functions as a regular computer monitor. Its main feature is that it is touch-sensitive, so you can interact with it both by touch and with a tablet.
Note: the cursor is shared between the workspace of the board and the monitor, so if you interact with the board, the cursor will move away from the workspace of the studio monitor. To get it back, simply click anywhere with the mouse or touch the monitor
4,5. The projector shows the person in the frame along with the elements on the right speaker screen. It allows you to see the text and objects you interact with. The speaker screen also helps to maintain the correct eyeline — to the viewers, it will look like you are looking directly at the objects and physically interacting with them.
The display of the workspace on the right speaker screen depends on the speaker’s choice of position, which we will look at in more detail later.
6. The left speaker screens are used in the same way but are more intended for speakers recording videos from the right position (and also left-handed speakers who are more comfortable writing with their left hand in this workspace). It is very important to keep your eyeline focused on the elements on the slide — if the object is at the top of the slide, look at the top screen, if it is at the bottom of the slide, look at the bottom screen. If you are recording from the left position, you’ll use the right speaker screen. From the right position you’ll use the left speaker screens. If you are in the center, you’ll use both screens at the same time.
Note: the workspace that is displayed on the right speaker screen will be cropped and will move when the speaker changes position. This is done on purpose so that the speaker does not always look only at the right screen and uses the speaker screen that corresponds to their position. This means that the eyeline will always be right
7. The camera is positioned opposite the board and in studios that have the required package the camera is also equipped with a teleprompter and a screen for self-recording. In this screen the speaker can see themselves and will maintain eye contact with the viewer when recording.
8. The studio light is located behind board and the backdrops. The light is pre-installed by Jalinga technicians. They do the color correction and adjust the lighting to suit the recording space when they set the studio up.
Note: do not move or reconfigure the light yourself! This could significantly affect the video quality and cause many technical problems. The lighting should only be adjusted after consulting Jalinga technical support
9. The studio has two backdrops — white and black. The black one can be adjusted using the Jalinga Studio software, which alters the lighting to match the corresponding background at the touch of a button. If necessary, you can turn the backlight on or off.
There is also a package with a Smart Studio function, which allows you to work with presets (video settings, teleprompter, pencil color, etc.). You can find the Smart Studio settings in the appendix for technicians.