Jalinga Guide
A full guide on how to use the studio
- General information
- Technical equipment of the studio
- First steps
- How to turn the studio on?
- How to open a presentation?
- How can I access my existing presentation in the studio?
- Controls
- How do I record?
- Home screen and recording
- Saved videos folder
- Managing takes
- Teleprompter* — only for studios where the teleprompter is included in the package
- Toolbar - Record
- Drawing
- Erase
- Cursor
- Change text to image
- Duplicate tools
- Recommendations before and after shooting
- How to create studio presentations?
- General recommendations
- Editor control panel
- Speaker position panel
- Slide transition animation
- Presentation objects - Files
- Presentation objects - Text
- Presentation objects - Browser
- Presentation objects - Map
- Presentation objects - 3D surface
- Presentation objects - Screen capture
- Presentation objects - External video stream
- Object animations
- Object properties
- Presentations in other formats
- PowerPoint, Google Slides, Keynote
- Importing a pdf presentation
- Presentations in Adobe Illustrator, Figma, Canva
- Streaming and online events in JS
- Studio settings
General information
Jalinga Studio’s main aim is to help speakers create interactive videos quickly and easily.
In this guide, we will look at the main aspects of interacting with the studio. Aside from the professional equipment, the most important part of the studio is the software developed by our team. Jalinga is a unique hardware and software package.
The Jalinga Studio software is the key component of the studio and allows you to record videos with graphics already added.
The system can record simple conversational videos, or also create entire video lessons and work with online conferences and streams integrated with YouTube, Zoom, MS Teams, Webex, various webinar systems and other platforms.
To get the best out of the studio, we recommend that you carefully read all the information in this user guide.
Technical equipment of the studio
The studio consists of two equally important parts: the hardware equipment and the software. Depending on the configuration of the studio, the specific characteristics of the studio equipment may vary slightly.
The main components of the studio are:
1. Sensor glass board
2. Studio server
3. Studio monitor
4. Projector
5. Right speaker screen
6. Two left speaker screens
7. Camera with teleprompter
8. Studio light
9. Stand with black and white backdrops
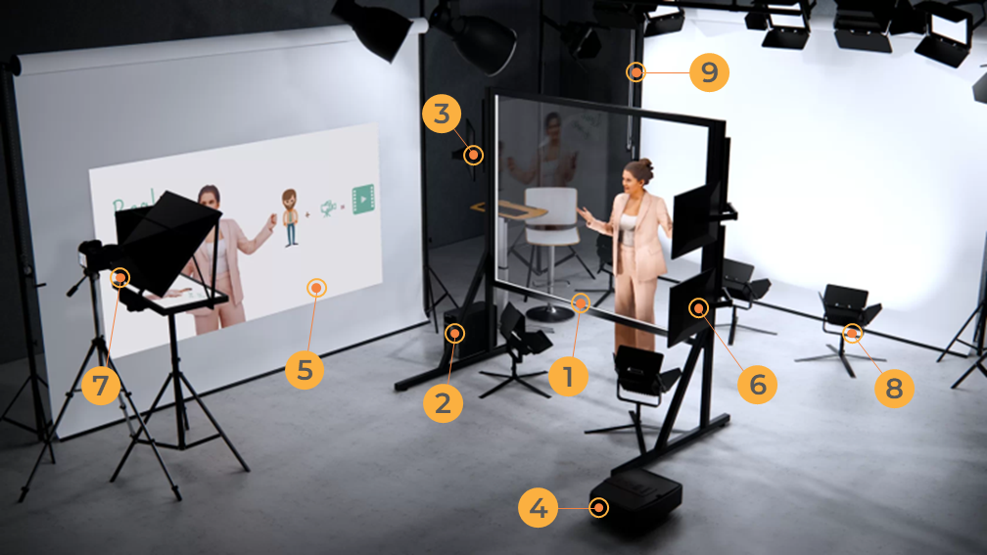
1. The sensor glass board is one of the key elements of the studio. Using the board, we can interact with objects in the presentation and also write and draw on it with a special marker. Everything you write and draw is digital so it can be erased in one click or you can use a digital eraser. If you prefer using physical tools, you can choose the special magnetic sponge that comes with the studio package.
Note: please try to make sure the board stays clean, it should be wiped down after each use, do not leave fingerprints or streaks on it, they will affect the video quality
2. The studio server is the “brain of the studio”. The server is a powerful computer that you can use like any other ordinary PC — use the internet, office programs and much more. The server’s main feature is the pre-installed Jalinga Studio licensed software, which combines recording and presentation editor functions.
3. The studio touch monitor performs the same functions as a regular computer monitor. Its main feature is that it is touch-sensitive, so you can interact with it both by touch and with a tablet.
Note: the cursor is shared between the workspace of the board and the monitor, so if you interact with the board, the cursor will move away from the workspace of the studio monitor. To get it back, simply click anywhere with the mouse or touch the monitor
4,5. The projector shows the person in the frame along with the elements on the right speaker screen. It allows you to see the text and objects you interact with. The speaker screen also helps to maintain the correct eyeline — to the viewers, it will look like you are looking directly at the objects and physically interacting with them.
The display of the workspace on the right speaker screen depends on the speaker’s choice of position, which we will look at in more detail later.
6. The left speaker screens are used in the same way but are more intended for speakers recording videos from the right position (and also left-handed speakers who are more comfortable writing with their left hand in this workspace). It is very important to keep your eyeline focused on the elements on the slide — if the object is at the top of the slide, look at the top screen, if it is at the bottom of the slide, look at the bottom screen. If you are recording from the left position, you’ll use the right speaker screen. From the right position you’ll use the left speaker screens. If you are in the center, you’ll use both screens at the same time.
Note: the workspace that is displayed on the right speaker screen will be cropped and will move when the speaker changes position. This is done on purpose so that the speaker does not always look only at the right screen and uses the speaker screen that corresponds to their position. This means that the eyeline will always be right
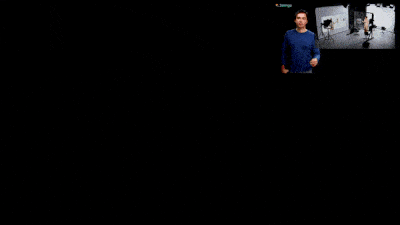
7. The camera is positioned opposite the board and in studios that have the required package the camera is also equipped with a teleprompter and a screen for self-recording. In this screen the speaker can see themselves and will maintain eye contact with the viewer when recording.
8. The studio light is located behind board and the backdrops. The light is pre-installed by Jalinga technicians. They do the color correction and adjust the lighting to suit the recording space when they set the studio up.
Note: do not move or reconfigure the light yourself! This could significantly affect the video quality and cause many technical problems. The lighting should only be adjusted after consulting Jalinga technical support
9. The studio has two backdrops — white and black. The black one can be adjusted using the Jalinga Studio software, which alters the lighting to match the corresponding background at the touch of a button. If necessary, you can turn the backlight on or off.
There is also a package with a Smart Studio function, which allows you to work with presets (video settings, teleprompter, pencil color, etc.). You can find the Smart Studio settings in the appendix for technicians.
First steps
How to turn the studio on?
-
Go into the studio and turn on the studio computer. If you turn on ceiling lights (or any outer light source not related to the studio), don’t forget to turn it off after turning the studio lights on. This is absolutely necessary!
-
Log in to your Windows account.
-
Run the Jalinga Studio app.
-
In the left part of the main page of the app there is a switching indicator. Click it to activate the studio.
-
You are ready for recording!
How to open a presentation?
Create a new presentation by clicking the first icon. This way you can create slides in the editor mode from scratch
Open an existing presentation by clicking on the second icon.

How can I access my existing presentation in the studio?
You can download it to your studio computer any way you like
-
Use a flash drive
-
You can send your presentations and files via email and download them any time you need. Don't forget to have a studio e-mail address ready and active on your studio computer.
-
Use any cloud storage: upload your existing presentations from your personal computer there and download them to the studio computer any time you need
Controls
Gestures
The glass board works with any object. The most popular one is the marker, but you can also use your finger. Although fingers do leave marks, sometimes it looks more organic. Don’t forget to wipe finger marks off the board!
We control the presentation and its elements using gestures, when we touch the sensor panel. The three main combinations are touching with one, two and three (or more) fingers.
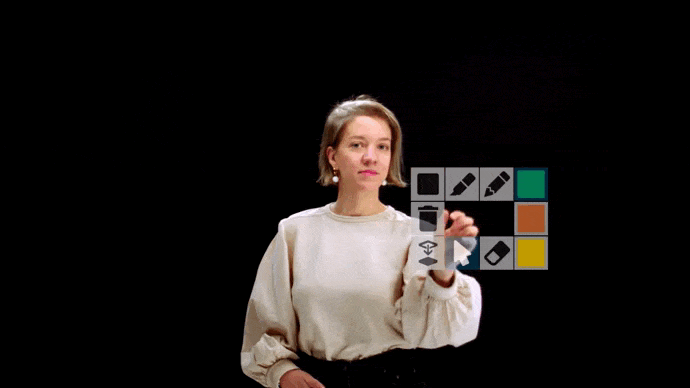
Let’s start with the last one: touching with three or more fingers simultaneously brings up a toolbar that allows you to fully control the recording.

To select the tool you need on the panel, you have to tap with one finger.
The toolbar is automatically hidden when you have selected a tool. If you want to close it without selecting a tool, you need to tap with one finger anywhere outside the toolbar area.
By swiping with two fingers, you can scroll through slides, control video playback and start animations (if you swipe to the left, and to the right if you want to go back).
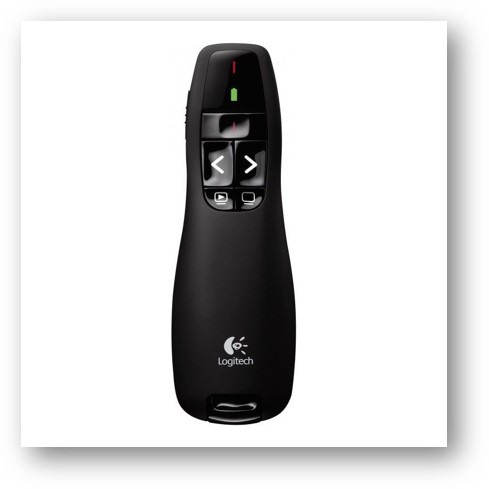
Presenter
The presenter has the same functions as the switching gesture. It can also be used to scroll through slides and play videos and animations.
Don’t forget that the switching gesture is universal — it scrolls through slides and starts videos and animations. If there is a video on your slide, for example, the gesture will first activate the video and only after that switch to the next slide.
How do I record?
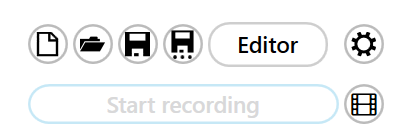
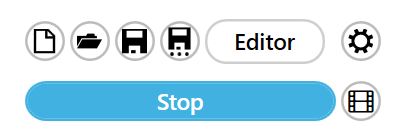
Home screen and recording
Studio recordings are done using the Jalinga Studio software.
The home screen, which opens when you start the program, is the recording mode.
All the basic operating functions are found in the left menu
Saved videos folder
The “Open Recording Folder” icon opens the folder on the system where the recorded videos are stored. A hard drive is pre-installed to save your videos to the server. When installing the studio, our technician creates a Video folder in the drive and specifies the path to the folder in Settings. Folders are given the same name as the presentation.
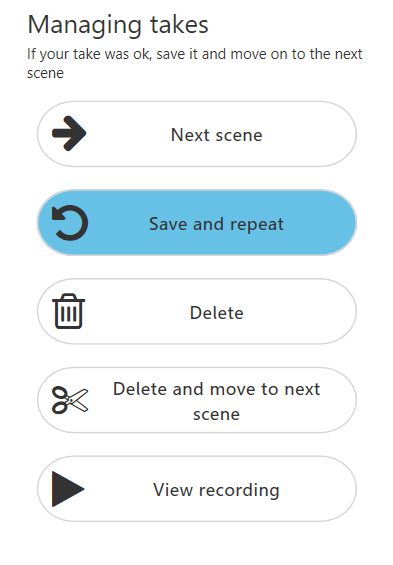
Managing takes
After stopping a recording, the program opens the “Managing takes” window, if you enable this function in Settings. It is not enabled by default. You can turn “Managing takes” on in the “Streaming and recording” section in Settings.
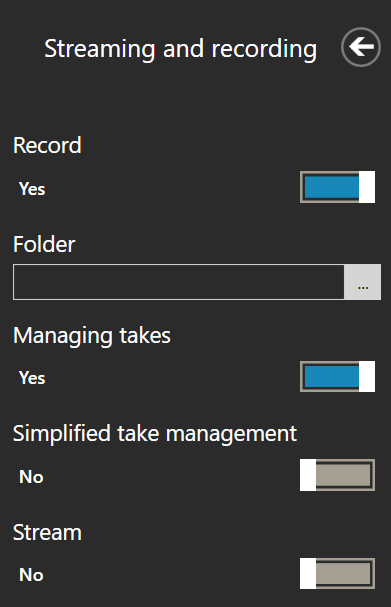
There are two modes for managing takes — simplified and advanced. A take is any video clip that you have recorded.
Simplified take management only allows you to save and delete takes, while advanced take management also allows you to split a video into scenes. An example of a scene could be a particular topic in your presentation. Scenes can be planned out in advance, for video lectures for example, or other videos with structured content.
With advanced management, the numbering will be like this — Presentation 1.1, Presentation 1.2, and when you switch to the next scene, the numbering will change to Presentation 2.1, Presentation 2.2, where the first digit is the scene number and the second digit is the take number.
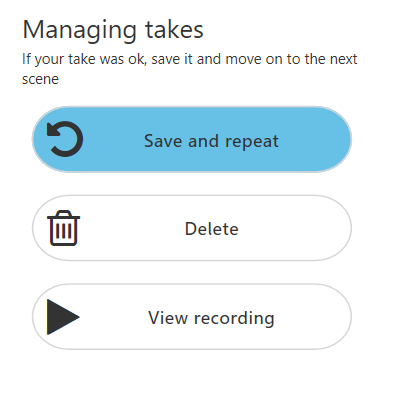
Simplified take management
Save and repeat — saves the recorded video and takes you back to the program’s home screen
Delete — deletes the take and takes you back to the program’s home screen. Don’t worry, the take is not deleted forever, it is moved to the “failed” folder. If you delete a take by mistake, you can restore it by moving it from this folder.
View recording — opens the recorded video in the media player so you can view it straight away. After that, you can return to the program’s home screen.
Advanced take management
“Next scene” — saves the previous take (it will be Scene 1 in the numbering order) and switches your recording to Scene 2 and Take 1 (and so on).
“Save and repeat” — saves the take and leaves you with the same scene number, just like delete — the previous take is deleted, and the scene number stays the same.
“Delete and move to next scene” — deletes the take and moves you to the next scene number.
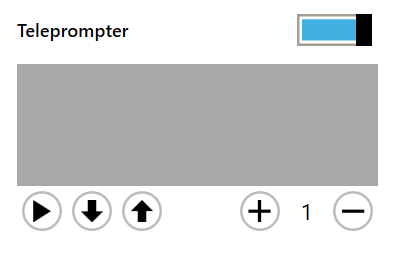
Teleprompter* — only for studios where the teleprompter is included in the package
The slider under the “Start recording” button turns on the teleprompter window. If it is not visible, you need to go to Settings to the Teleprompter section and enable “Use teleprompter”.
In the teleprompter box, you need to insert text from any text editor. The > button starts the teleprompter, and the up and down buttons allow you to move up and down the text correspondingly.
You can also scroll through the teleprompter text using the mouse wheel, or the slider to the side of the window (this is much faster). The up and down buttons are most commonly used if you need to slightly scroll the text up or down. The + and – buttons control the speed at which the text moves. The speed should comfortably match your pace of speech. We recommend practising this before recording.
To make things easier, we made some rules for formatting text. They take into account the fact that when using the teleprompter, certain text formatting features become unnecessary because the teleprompter does not recognize them, or they may confuse you when you are reading from the teleprompter.
• Do not use text formatting (bold, italics etc.)
• Do not use numbering, headings and lists
• Font size and type are not taken into account
• Add pauses to a text using blank lines or the symbols * (asterisk) and ! (exclamation mark)
• Write out abbreviations in full
• Write numbers and dates in words
• Find synonyms to replace words that you stumble over
When interacting with a presentation, add hint words so you know exactly what action you need to do and so the teleprompter text does not scroll too far ahead.
Toolbar - Record
The toolbar is the main element for controlling a presentation. Let’s look at the tools one by one.
“Record” starts and stops a recording. Using this function, speakers can record by themselves without the need for additional tools. When you press the button, you’ll have 3 seconds to prepare and then the recording will begin. After the recording has started, the record button on the toolbar will change to a stop button.
Drawing
The “Marker” allows you to draw or highlight with a thick semi-transparent line in the color of your choice.

The “Pencil” allows you to draw a thin line in the selected color. The width and color for the pencil and marker can be selected in the Jalinga Settings.

In the toolbar there are 3 colors available for the pencil and marker. When you select one of the colors, you will immediately be able to start writing with the pencil.

If you select a color for the marker, after you have selected the color, you will need to select the marker.
The colors can be changed in Settings in the “Draw” section. In this section, you can also select the width and opacity of the marker. The colors follow the RGB color model. If you do not know the parameters of the color you need, you can use any online color palette, such as https://csscolor.en/
The parameters should be entered accordingly – Red R, Green G, Blue B

When using the marker to write on the board, here are some tips for better sensor sensitivity:
• do not write too fast;
• use a marker with a tip diameter of more than 5mm.
You can write notes on each slide individually. When you switch between slides, the notes you wrote will remain on the previous slide.
Erase
There are several ways to erase what you have written.
The “Eraser” is used when you don’t need to erase a full sentence, but just correct one part. It has a pretty small radius.

The “Bin” is used to delete everything written on a slide in one touch. Please note, this only applies to things written by the marker or the pencil.

If you have a list of several points, and you need to erase one of them, but you don't want to delete everything on the slide, we recommend using the sponge that is attached to the board in your studio.
.
Cursor
The “Cursor” is a tool for working with objects. The cursor helps you to move objects, hide and show them, increase and reduce sizes, click buttons, etc. It performs the same functions as the left mouse button.

Change text to image
“Change text to image” transforms everything you wrote on a slide into an image, so you can move everything on the current slide, copy it to other slides, change the size, or save on a hard disk as a separate file for future recordings.
After using this tool, you will no longer be able to erase the image using the previous methods, but you can hide/show it using the cursor. To delete an object, you’ll need to use the editor – go to presentation editor mode and delete it manually.

Duplicate tools
All tools in the toolbar are duplicated on the studio screen. This means that you can record videos without using the toolbar – if an assistant at the studio computer is able to switch the tools for the speaker when needed. The main screen can also be used to switch between slides.

Recommendations before and after shooting
1. Prepare all the materials for the shoot BEFORE you get to the studio. Make sure you have:
- The text for the teleprompter
- The presentation
2. Rehearse your talk along with the presentation slides.
For speakers who have little experience on camera, the whole process may seem difficult, even if they are experts in their field. Having a good rehearsal will help to reduce the shooting time and make the recording process faster and more productive.
If you plan to record the video in parts, you should make sure you know how to split them before you start shooting.
You shouldn’t split them by the number of slides, and certainly not by sentence or paragraph.
Try to split the presentation up into logical parts: welcome, introduction, module 1 etc.
The switch between takes is noticeable, but it looks organic if the takes are split up logically.
3. Choose comfortable and appropriate clothing.
Choosing the right clothes for a recording will give you confidence and make you feel more relaxed.
It’s important that you feel good when you look at yourself in the studio screens.
We recommend wearing clothing that contrasts with the background – white clothing for a black background, or black clothing for a white background.
Avoid sheer fabrics, large knitted patterns, checks or stripes. Wear comfortable footwear – it won’t be seen in shot, and the filming process can be tiring.


During the recording
1. Record in takes.
We know that every speaker can record material in one take. However, if that’s not possible, we recommend recording in takes. If you don’t manage to record the take in the way you wanted, simply click “Stop” and go back to the beginning of the phrase. You can easily splice the takes together in the edit.
Some people find it easier to record a video in one single take, including any errors and mistakes. This is also an option, but in our experience, we can say that splicing together good takes in the edit is easier to do.
2. Pause at the beginning and end of a take
After pressing “Sart”, pause for 1-2 seconds, and then start to speak.
Your intonation should go up. These few seconds can be cut, but there is no way of getting back speech that has accidentally been missed. The same applies to the end of the recording. Speak until the end of the text and look into the camera, then you can press the “Stop” button. Correspondingly, your intonation should go down towards the end.
3. Change your position during takes
But try not to abruptly change your position and pose between takes.
Choose a comfortable pose in which you will end the take and then start a new take. It’s important to remember where you were standing in the frame in the previous take, how your hair was and where your hands were.
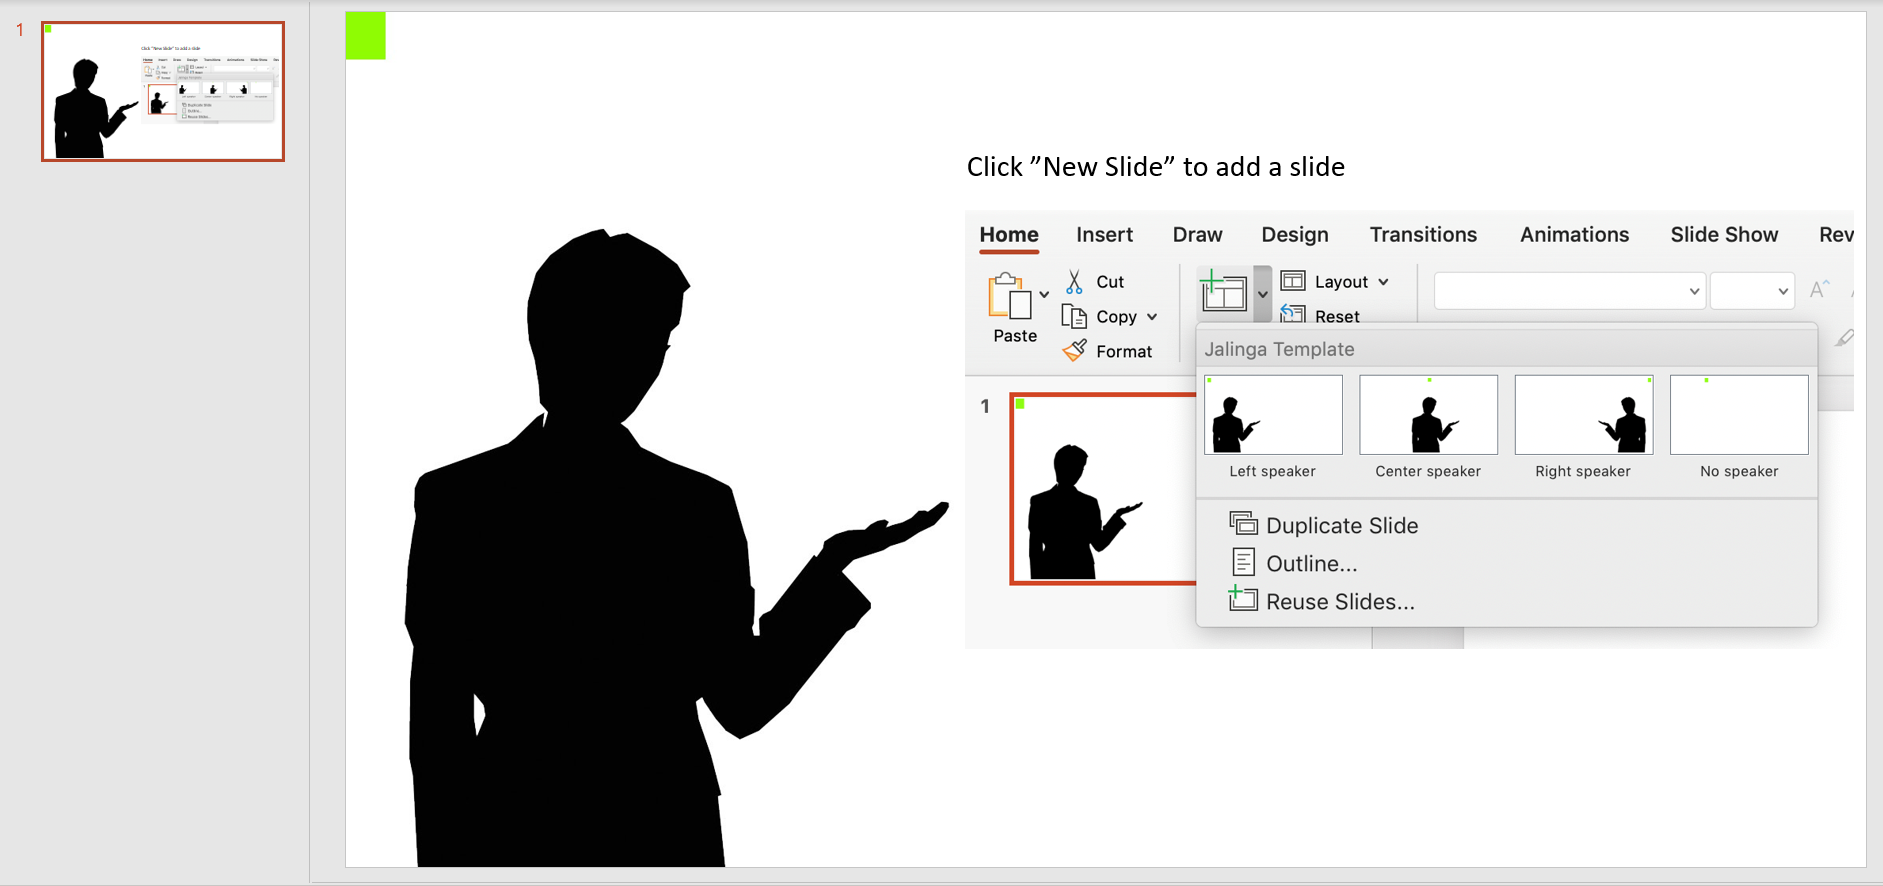
How to create studio presentations?
The Jalinga Studio editor is the workspace of the program that allows you to create your interactive presentations. Jalinga Studio supports several presentation formats, but the best one is the jpres format, which is created and used in our software program. You can also use pdf format, but this will mean a reduction in interactive capabilities. The best option is to combine two formats – create graphic elements (diagrams, figures, titles, icons) for example in PowerPoint, save them as images and then transfer them to the Jalinga Studio editor. We recommend performing all other tasks (adding interactive elements to presentations, adding animations etc.) in our editor. When you load the editor, you can see the workspace and a schematic view of the speaker on the slide. Arrange the slides according to the speaker’s position.
General recommendations
1. Don’t put too many elements on a slide, avoid an “information overload”
2. The speaker should not block any elements of the presentation, leave some space
3. Place no more than 5 topics or illustrations on a slide
4. Don’t duplicate in writing what the speaker is saying
5. Replace text with diagrams, drawings, photos and animations
6. Add diagrams without a background (gif, png)
7. Recommended fonts: Montserrat, Arial, Times New Roman, Roboto, Century Gothic
8. Size of titles: 50-60, size of body text: 25-35
Editor control panel
The standard set of tools in the left slide editor panel includes:
• Create new slide;
• Add a slide from another presentation to the current one (if you need to add multiple slides to a presentation that is already open; slides can be added in jpres and pdf formats);
• Edit animations;
• Basic set of slide editing functions (copy, paste, cut, delete, undo and redo)

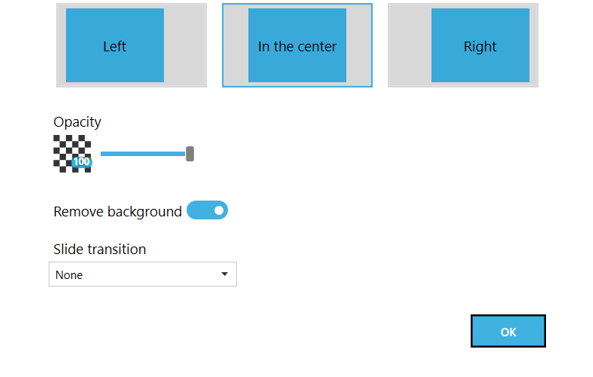
Speaker position panel

The speaker position panel changes this parameter, the position can be changed for each slide individually. During recording, the speaker can be in 4 positions: left, center, right, no speaker. We recommend changing position in the frame a few times, but not too often. The Speaker position property also distorts the projection of the speaker in the right screen. This is needed so the speaker can maintain the correct eyeline with the elements of the presentation when there is a change of position.
Left position
Use the left position if you are right-handed, and also if the slide has small text and details – they will be easier to see on the large speaker screen to the right.
Most of the presentation will be visible on the projector background.
For example, our speaker is right-handed. We need the speaker to be able to write something on the slide. It will be easier for the speaker to look at the projector background on the right and see the objects that he or she is interacting with on this background.
To do this, on the slide we select left speaker position. The picture on the projector background will display the part of the slide that is on the speaker’s right-hand side.

Center position
The center position is used as a transition between the left and right positions or to demonstrate two objects that are on either side of the speaker. This position is perfect for comparing elements.
The projector background will display only the right half of the presentation.
This means that when referring to objects on their right, speakers will look into the projector background, and for objects on their left, speakers will look into the left side monitors.
Correspondingly, the picture on the projector background will only display those objects that are on the right side of the slide. The left part of the slide will be displayed on the left side monitors. This enables the speaker to focus correctly on objects.

Right position
The right position is rarely used. If you are left-handed and want to interact with the presentation and write on the slides then you should select this position. Most of the slide will not be displayed on the projector background.
If we want our speaker to be able to interact with objects on the left or write with the left hand, we select right speaker position for the slide in the editor.
Only a very small part of the presentation will remain on the projector background: the speaker is meant to look either at objects on the left side monitors, or the camera, addressing the viewers.

No speaker
No speaker means that you will be heard, but the viewer will not see you on screen. The No speaker position is helpful if you need to show an object up close and you don’t necessarily need to be on screen to talk about it. You should use this position if there is too much information on a slide and you can’t divide it into two slides without making it difficult to understand the overall meaning, and also if there is no space left for the speaker.
If the presentation slides are not organized correctly, there simply may not be enough space left for the speaker because the objects positioned on the slide will cover the speaker in the frame. In addition, as the pictures change on the screens (left side monitors and the projector background) the speaker’s eye contact with objects of the presentation may be affected. This will be noticeable in the final video: it will look as though the speaker is looking past the objects.
Slide transition animation
Slide transition is used to make slide transitions more dynamic. The animation can be set for each slide individually or it can be left off. The animation will run when transitioning to the slide that it was set for.

Presentation objects - Files
The files that can be added are
- images in jpeg, png
- gif
- audio in mp3 and aac
- video in mp4 format.
Other formats are not supported.
Images


Use images and diagrams in high resolution and without watermarks.
We recommend using images in PNG format with a transparent (cut-out) background.
GIF

Have almost the same features as regular images, but also has several additional options
• “Autostart” – start playback as soon as you transition to the slide;
• “Loop playback” – play a gif file continuously until you transition to the next slide.
Video
Audio and video playback on a slide is activated by touching the “Go to the next slide” arrow or using the alternative: swiping with two fingers to the left, or the right button on the presenter. To pause playback, use “Go to the previous slide” or swipe right, or the left button of the presenter.
When adding a video, you can expand it to a full screen so the speaker is no longer visible, but the voice can still be heard. This is a great way to provide commentary on a video.
Presentation objects - Text
To add text, you have to touch and hold it and move it onto the slide, or simply touch the text button and the object will automatically appear on the slide. To edit the text, double click on it with the mouse or copy and paste your text.
When you click on the text, the grey panel at the bottom will display text editing elements.

With text, we can format the font, the size and other functions available in most editors.
If the text does not fit in the area allocated for it, you can turn on the “scrolling text” function. You can scroll the text within the selected area. For the slider to work, you have to double click the text. When recording, the text can be scrolled up and down using your finger or the marker on the touchboard.
The “show control panel” button adds the up and down buttons next to the text. You can scroll the text using these buttons or the slider.
When you change the position of a text object on a slide, the arrows may move up/down right/left. If the text is in the top part of the slide, the arrows will go down, and if it is in the bottom part, the arrows will go up. The same is true for the right and left parts of the slide. This happens automatically to make it easier for the speaker to click them.
Presentation objects - Browser
The Browser object allows you to interact with websites while recording a video.
To get started, all you have to do is fill out the address bar in editor mode. If the website address is short, you can enter it manually. Wait for the site to load. If the address is long, you should copy it from a computer. When recording, you can click on any links in the browser window. To fill in fields on the site using the keyboard or to go to another site (not available through the site you are on), you need to switch to editor mode (during recording mode this is not available).
It is best to position the browser window to the right of the speaker. This will make it easier to interact with it if you are right-handed. In addition, when it is positioned to the right, you’ll interact with the browser looking into the projector screen, which is easier for seeing small details.
The size of the browser window should be selected based on 2 important points: ease of interaction and the appearance of the site. The website page will be displayed approximately the same as in most mobile versions.
Ease of interaction means that you need to consider the distance of the buttons that you will need to press, or the areas in which you’ll be making notes. If you have to go outside a window (fully or with the upper part of your body) in order to reach a part of a site that you need, it’s better to reduce the size of the window.
As you reduce the window, the site will adjust and after a certain point (you’ll know this by trial and error) it will greatly alter the position of objects on the site. This is the second important point to consider.
Before recording, it is better to walk through the site in the same way as in your video, to make sure that you won’t run into any problems. Set the opacity to 70-80%. If your hand goes outside of the website when you’re writing or scrolling through the browser, your hand should still be visible. And if you point to something in the window, your hand should not be cut off too much.
The browser has control panel buttons: go back, go the last page you were on, reload page, enlarge and reduce browser window. The control panel can be turned off or stopped. Its position changes depending on the position of the browser on the slide and is set automatically.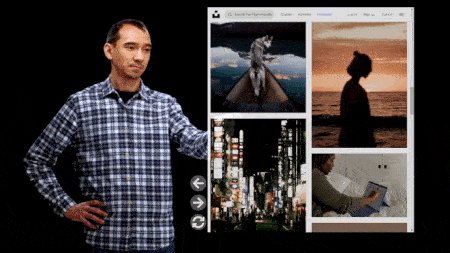
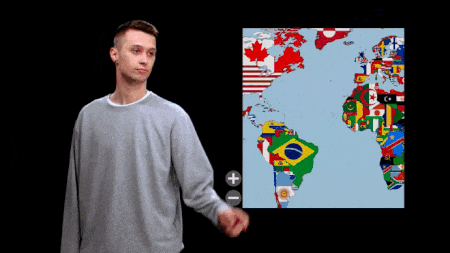
Presentation objects - Map
A map is a high-resolution image that is too big for the screen size (resolution higher than 1920x1080), it doesn’t necessarily have to be a map. It could be a table, a diagram or another drawing.
The purpose of this object is to enlarge any part of the image, so that you can show them in detail or highlight only certain parts. Set the fragment of the map you want to show first on the slide.
Within the map area, the image can be scrolled, enlarged, or reduced.
If you won’t be changing the size during recording, you can remove the plus and minus buttons by clicking on “Show controls”. This is where you’ll find the button to change an image in a map. When you click it, the system will prompt you to choose another image from the file explorer.
Presentation objects - 3D surface
The 3D surface object allows you to display the function of two variables as a 3D object. To add this function, drag the “3D diagram” object to a slide. After double clicking on the object, you will be able to edit the function and set the minimum and maximum values for constructing the function. There are limits to 3D diagrams: the function must be computable in the definition area, the function can only be given in one expression, only Cartesian coordinates are supported, and there is no guarantee that non-continuous functions will give the correct output.
Like any object, diagrams can be moved, resized and the opacity can be altered.
The control elements mentioned previously can be removed by clicking the corresponding button.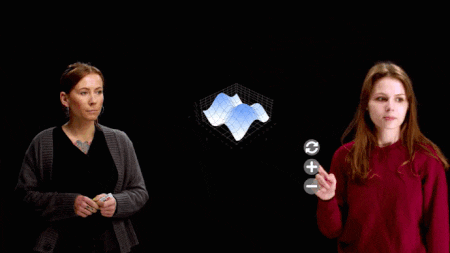
Presentation objects - Screen capture
Screen capture allows you to share the desktop of the studio computer. It is used to demonstrate a program during your presentation and control programs in real time.
Add an object to a slide by clicking on it and dragging it to the screen.
If necessary, we can change the size and position of the object on the slide. Screen capture has an aspect ratio of 16:9, which corresponds to the size of the screen and the slide.
If you plan to interact with an object when recording, change the opacity value so it is easier for you to click on the buttons you need. If you increase the size of the screen capture and select the “no speaker” position, you’ll be able to record screencasts without using third-party programs.
After you have put in the required object settings, you need to exit editor mode. Open the slide with the “Screen capture” object and the program or file you need to stream the image during your recording. Start the recording or stream. To hide the computer’s control panel, you can switch the program to full screen mode by pressing the F11 key.
To display small details, you can increase the size of program elements displayed using the ctrl and + keys or ctrl and the mouse wheel.

Presentation objects - External video stream
Using the “External video stream” object, an additional speaker can join you from a device that is not connected to the studio computer.
This could be useful for:
• Connecting a guest speaker’s camera when conducting webinars or online meetings
• An additional angle of the speaker displaying the same slide (for “B-roll” secondary footage)
In the presentation editor in the left menu, click on the “External video stream” object or drag this object to the slide. An image will appear on the slide with a QR-code and additional information to connect:
Click on the object to activate control mode. The object control panel will now display functions for object settings. As with other objects, in “External video stream” you can change various settings. In addition to the standard settings, you can choose to display object controls during recording. You will need to enter the connection code on the website in order to connect to the presentation, so before leaving the editor you should either remember it or enter it straight away.
A separate code will be generated for each device. If you transfer a presentation from one computer to another, be aware that the code will change.
Before starting recording, you need to check which code you will need to connect.
A code can only be used for one active connection. If you plan to connect multiple devices or multiple windows from the same device, use multiple objects on the slide – each one will have its own connection code. If you try to connect to an object and the code is already in use, a message will appear saying “This room is already occupied!”.
Connecting to a presentation
There are various ways to connect to a presentation in the “External video stream” object:
• Go to call.jalinga.studio and enter the connection code
• Scan the QR-code from the device
Your browser may ask for permission to use the camera and microphone; you’ll need to allow this. If you deny by mistake, go to the browser settings and allow access to the camera and microphone.
You can disable video and/or sound by clicking on the corresponding icon:
If there are any problems with receiving video or audio from the device, on the connection screen in the bottom right corner you will see a warning symbol and, if you click on this, you’ll be able to find out more about the problem. If you are unable to resolve the issue, contact technical support and describe the problem.
When everything is set up, you can switch to the “View stream” tab to “get into” the presentation. If a slide is open in the presentation with the “External video stream” object, which a device is connected to, you’ll be able to watch the presentation with the object on the slide. If the speaker switches to another slide, a message will appear saying “Waiting for a partner…”
A video can be expanded to full screen by clicking on the “Full screen view” button.
To exit from full screen mode, click the cross in the center of the screen, the “back” button on a mobile device or the ESC key on a keyboard.
If you enable the “Show controls” function in the editor, the speaker will be able to turn on/off sound from the video
Unlike the “Screen capture” object, the “External video stream” object does not allow the speaker to control a device’s desktop: all the controls are from the device that is streaming the video.
Please note
“Error receiving video: [You denied access]” or “Error receiving audio: [You denied access]” means that the browser does not have permission to use your camera or microphone correspondingly.
You do not need to allow access to your devices if you are not going to say anything and plan to only share the desktop. Otherwise, this problem can be solved by granting the required access to the site. For example, in Chrome, click on the padlock icon to the left of the address bar and allow access to the camera and microphone
Object animations
There are three animations available in Jalinga Studio:
• Show
During animation a hidden object will become visible
• Hide
During animation a visible object will become hidden
• Highlight
During animation a visible object will become hidden and then visible again
For the animation type, select one of the animation effects:
• None
No effect applied; the object will immediately become visible or hidden
• Appearance
A smooth change in opacity
• Fade
A smooth change in opacity from top to bottom
• Zoom
The size of the object will change from 0 to 100%
• Slide and fade
The object will appear from left to right
Animation should only be used on files (images, gifs, videos) and text elements; other objects may not work correctly if animations are added to them.
To configure animations, you need to go to animation editor mode by clicking on the star-shaped “Edit animations” button.

After that, an “Add” (“+”) button will appear over each element directly on the slide. Clicking on this button will create an animation for the selected object. The image name is generated automatically – in this case it is Image 1

After opening the dropdown list, we can set the animation settings described above.

Simultaneous animation of two or more objects
You can set simultaneous animation of objects to make two or more objects play an animation on a slide at the same time. To do this, add an animation for another object on the slide. Use the mouse to drag the animation for “Text 1” to the “Animation 1” group. When they are in the same group, the animations will play at the same time.
There is no limit to the number of animations you can add to the same object. To do this, click on the plus sign each time.
Object properties

Objects on the slide have additional properties. They are displayed on the grey panel at the bottom of the editor
Layers
The first two buttons are for working with layers. They allow you to bring an object toward the front or send it toward the back.
If you have more than two objects on a slide, you may need to organize them into layers.
For example, if you have a picture and want to put text on top.
In order for the text to be on top, you need to select the object and touch the Bring forward icon on the grey panel. The result will be the same if you select the picture and touch Send backward.
Show/hide function
By default, this function is disabled (objects are initially visible and cannot be hidden or shown). To enable the function, you need to touch an object, allow it to be hidden or shown and select the initial display mode.
Opacity
Grid
The grid allows you to display a grid on the slide. This helps you to accurately position objects on the slide.
Show controls
This function allows you to turn on or off the controls for certain objects on the slide, e.g., for a map, browser, diagram, screen capture and an external video stream.
.
Presentations in other formats
In Jalinga you can also use presentations created in other programs – PowerPoint, Google Slides, Keynote. For these programs, you need to export the presentation and download it in pdf format with the “no background” function. The key difference will be that there will not be any interactive elements in the presentation or certain formatting features.
PowerPoint, Google Slides, Keynote
A presentation created in these editors becomes static when you open it in Jalinga Studio, and a slide will be seen as a single object.
Static means no animations or dynamics (e.g., videos or gif files are replaced by still frame images).
Let’s look at creating a presentation in the most widely used program – PowerPoint.
To create a presentation, use a template available for download at this link.
At the bottom of the web page there are 2 types of templates: for white or black studio backdrops.
You can make additions to the template, by adding a logo for example.
To use a template, first open it. Then create a slide based on a corresponding theme.
Add information to the slide, except in the place where a person is drawn.
Do not use colored backgrounds and watermarks; it is better to create moderate and concise presentations on a white or black background.
Advantages of our templates:
- The silhouette of the person helps you to place information on the slide correctly
- Jalinga Studio recognizes the selected position of the speaker on the slide, you do not need to further adjust the position in the editor.
Don't forget to save the presentation as PDF!
Importing a pdf presentation
To open a PowerPoint presentation in Jalinga Studio, save the presentation in PDF format. To do this in PowerPoint, go to the
“File” > “Save as” and select PDF format. In some versions of PowerPoint, you can save in PDF format by going to “File” > “Export”. The saved PDF file can be loaded in Jalinga Studio by dragging it to the program window or clicking the Open button
1. To load the presentation, click on the Open button.
2. Load the file.
3. To open the presentation in PDF format, you need to choose how to import the content.
4. If you have used our template, you won’t need to worry about the position of the imported presentation. If you haven’t, you’ll need to select the position based on how you positioned the material.
Import contents in the center expands your presentation to full screen. Import left or right reduces the size of your presentation to approximately 2/3 of a slide, so space is left for the speaker. The opacity is best set at approximately 70.
Presentations in Adobe Illustrator, Figma, Canva
When creating a presentation in these programs, save it as a png with a transparent background. You then need to open the editor and add the presentation as an image file. Select all images at once.
Streaming and online events in JS
It’s easy to use Jalinga Studio to give webinars, online conferences, lessons, and streams. To do this, you can choose a webinar platform, YouTube, Zoom, or social networks.
Streaming & where to host online
• Webinar platforms
• YouTube
• Zoom
• Social networks
In order to interact with webinar participants there is a “Show speaker screen” function, which is activated when you click on the corresponding button on the presenter. To enable this option, go to General settings and select “Toggle desktop to the speaker’s screen” as an additional button feature.

This will allow you to see the webinar platform window displaying your students and the chat on the screen. The webinar platform site can also be seen on the touch monitor. Viewers won’t see the desktop; only you will see it.
YouTube streams
Step 1.
First, you need to go to YouTube ( https://youtube.com )
Step 2.
Sign in using the profile you want to use for the stream.
Step 3.
Go to the YouTube Creator Studio ( https://studio.youtube.com )
Step 4.
In the top right corner there is a “Create” button.
Here, select “Go live”
Step 5.
After you have selected “Go live”, YouTube will ask you to choose when you want to start streaming: Now or Later. Select the one you require.
Step 6.
You need to copy the KEY and URL indicated by the green numbers 1 and 2.
Step 7.
In Jalinga, go to Settings – Streaming and recording – Turn on stream and paste in the URL and KEY.
Step 8.
After you have pasted the URL and KEY, in the main menu the “Start recording” button will be renamed “Start recording and stream”. As soon as you click it, a stream will start automatically on YouTube.
Zoom streams
Step 1.
You need to sign in to your account and select
“organize/plan zoom conference”.
Step 2.
When starting the conference, select the required type of conference.
Step 3.
In the Zoom window that has opened, in settings you will need to select:
- Camera: Jalinga Virtual camera V2
- Microphone: Rode microphone
- Speakers: Jabra Speak 410 USB speakers with echo cancellation
After that, you can start a conference!
Studio settings
You can open the program settings panel using the gear button. In this section, you can find options that are useful both for ordinary speakers, and also the technician in your studio. Let’s look at the most useful settings from the speaker’s point of view
General settings
You can select the interface language (Russian, English, Polish, Latvian) and also select the presenter’s additional button feature. In this menu, you can also load settings if you accidentally changed something.

Streaming and recording
We do not recommend changing any of the settings below (audio settings, streaming codex settings and recorder codex settings) without consulting our technicians.


Drawing
Allows you to configure drawing tools and select preset colors. This has been discussed in the section on drawing.

Teleprompter
Allows you to turn the teleprompter on and off and also provides further customization options.

Appearance
Light and dark theme, select a theme according to the background that you will be recording on. Light for a white backdrop and d for a black backdrop

About the program

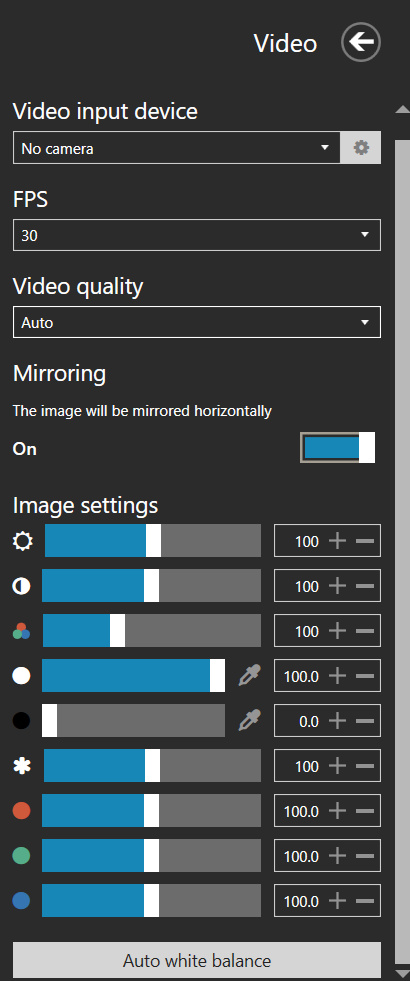
Video settings
Video input device – this is the video capture card being used. The source should be DeckLink Mini Recorder 4K or Megawell Pro Capture. (This is where the camera signal goes through)
The video quality for the Studio can be chosen from 1080p or 2160p. However, for 4K shooting you need to change the camera image output settings to 4K. The settings are shown below.
Mirroring – this setting allows you to mirror an image from the camera. This is needed so that everything written on the board is displayed correctly (from left to right)
The image setting is done by an installation specialist and is saved in a separate folder. It is not recommended that you change these settings after the studio is installed. If the settings have been changed by accident, the old settings can be loaded as follows: General settings – Load settings and select the most recent settings saved.
Video input – depending on the camera installed, the image can be transmitted by both SDI and HDMI. In these settings, you need to select the input that the camera is connected to. If there is no signal on one of the cables, you can switch the input. If this doesn’t help, you should contact technical support.
Audio settings
Microphone – here you need to select the recording device that is installed in your studio. Choose either the lapel microphone of your model for recording video, or Jabra for online streaming.
Second audio input – leave this blank, if you enter something here, there will be an echo during the recording.
Mono – yes
Audio delay – 2
Presentation sound level – as required
Audio output device – this can be left on Default.
If you feel that the speaker is talking too loudly/quietly, you’ll need to do a soundcheck and adjust the volume using the Gain setting on an audio device, or contact technical support.

Speaker screen settings
If you have a studio with a teleprompter, your “Speaker screen” settings will look like this:

Where the projector is the project, the teleprompter is a 27-inch monitor in the center, and the left monitor is the two side monitors connected via the splitter.
The “Set up grid” setting is needed to balance the projector image on the right projector screen. This setting is done by an installation specialist when installing the studio.
Show info panel – off
Move info panel up – off
You do not need to change the info panel settings. It is an option that allows you to show slides in the lower part of the monitor, but which results in a slightly distorted image.
Glass board calibration
When you update Windows, the glass board may stop working: when you touch the screen the cursor may not appear, or the cursor may not be in the same place as where you touch on the board.
1. In Jalinga, go to “Settings” – “Touchboard”.
2. Select the model of the lens that is installed on the camera. If you don’t know the model, leave this setting as “Other”

3. Click the “Start calibration” button.
Touch the touchboard at the point on the screen every time it appears. To make the calibration easier, place your finger on the touchboard, slide your finger so that it is under the calibration point, then lift off your finger. The touch point will be recognized as the point at which you lift your finger off the board.
You don’t have to try and get exactly in the center straight away. The easiest way to do it is to touch the board with your finger or the marker next to the point and slide your finger or the marker to the center without lifting off from the board, and then lift off.
You need to do this with all the points as they appear in the corners for three rounds.
When the calibration is complete, the text and points will disappear from the screens.
Please note:
If at the very beginning (point in the bottom left) you accidentally touch the board and the point moves over to another corner, you’ll need to stop the calibration and start again.
You can carry on touching the following points as normal, but when you get to the corner where you touched the board in a different place, the point won’t react to your touch because it will be expecting you touch the place where you touched it by mistake. That is why we have to cancel the calibration and start again.