Studio settings
You can open the program settings panel using the gear button. In this section, you can find options that are useful both for ordinary speakers, and also the technician in your studio. Let’s look at the most useful settings from the speaker’s point of view
- General settings
- Streaming and recording
- Drawing
- Teleprompter
- Appearance
- About the program
- Video settings
- Audio settings
- Speaker screen settings
- Glass board calibration
General settings
You can select the interface language (Russian, English, Polish, Latvian) and also select the presenter’s additional button feature. In this menu, you can also load settings if you accidentally changed something.

Streaming and recording
We do not recommend changing any of the settings below (audio settings, streaming codex settings and recorder codex settings) without consulting our technicians.


Drawing
Allows you to configure drawing tools and select preset colors. This has been discussed in the section on drawing.

Teleprompter
Allows you to turn the teleprompter on and off and also provides further customization options.

Appearance
Light and dark theme, select a theme according to the background that you will be recording on. Light for a white backdrop and d for a black backdrop

About the program

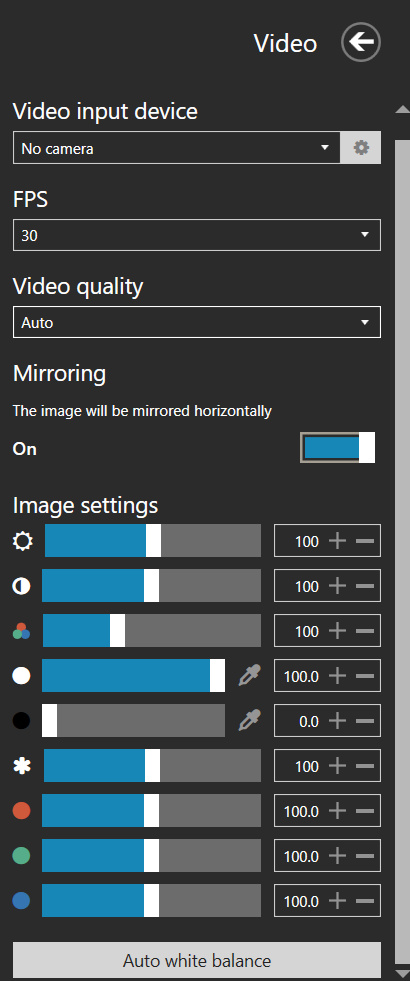
Video settings
Video input device – this is the video capture card being used. The source should be DeckLink Mini Recorder 4K or Megawell Pro Capture. (This is where the camera signal goes through)
The video quality for the Studio can be chosen from 1080p or 2160p. However, for 4K shooting you need to change the camera image output settings to 4K. The settings are shown below.
Mirroring – this setting allows you to mirror an image from the camera. This is needed so that everything written on the board is displayed correctly (from left to right)
The image setting is done by an installation specialist and is saved in a separate folder. It is not recommended that you change these settings after the studio is installed. If the settings have been changed by accident, the old settings can be loaded as follows: General settings – Load settings and select the most recent settings saved.
Video input – depending on the camera installed, the image can be transmitted by both SDI and HDMI. In these settings, you need to select the input that the camera is connected to. If there is no signal on one of the cables, you can switch the input. If this doesn’t help, you should contact technical support.
Audio settings
Microphone – here you need to select the recording device that is installed in your studio. Choose either the lapel microphone of your model for recording video, or Jabra for online streaming.
Second audio input – leave this blank, if you enter something here, there will be an echo during the recording.
Mono – yes
Audio delay – 2
Presentation sound level – as required
Audio output device – this can be left on Default.
If you feel that the speaker is talking too loudly/quietly, you’ll need to do a soundcheck and adjust the volume using the Gain setting on an audio device, or contact technical support.

Speaker screen settings
If you have a studio with a teleprompter, your “Speaker screen” settings will look like this:

Where the projector is the project, the teleprompter is a 27-inch monitor in the center, and the left monitor is the two side monitors connected via the splitter.
The “Set up grid” setting is needed to balance the projector image on the right projector screen. This setting is done by an installation specialist when installing the studio.
Show info panel – off
Move info panel up – off
You do not need to change the info panel settings. It is an option that allows you to show slides in the lower part of the monitor, but which results in a slightly distorted image.
Glass board calibration
When you update Windows, the glass board may stop working: when you touch the screen the cursor may not appear, or the cursor may not be in the same place as where you touch on the board.
1. In Jalinga, go to “Settings” – “Touchboard”.
2. Select the model of the lens that is installed on the camera. If you don’t know the model, leave this setting as “Other”

3. Click the “Start calibration” button.
Touch the touchboard at the point on the screen every time it appears. To make the calibration easier, place your finger on the touchboard, slide your finger so that it is under the calibration point, then lift off your finger. The touch point will be recognized as the point at which you lift your finger off the board.
You don’t have to try and get exactly in the center straight away. The easiest way to do it is to touch the board with your finger or the marker next to the point and slide your finger or the marker to the center without lifting off from the board, and then lift off.
You need to do this with all the points as they appear in the corners for three rounds.
When the calibration is complete, the text and points will disappear from the screens.
Please note:
If at the very beginning (point in the bottom left) you accidentally touch the board and the point moves over to another corner, you’ll need to stop the calibration and start again.
You can carry on touching the following points as normal, but when you get to the corner where you touched the board in a different place, the point won’t react to your touch because it will be expecting you touch the place where you touched it by mistake. That is why we have to cancel the calibration and start again.